Home / Behavioral Health Medicaid Enrollment Checklist
BLOG
Behavioral Health Medicaid Enrollment Checklist
Align NPIs, EIN/W-9, licenses, disclosures, and EFT to avoid Medicaid enrollment delays.
SHARE
Miss one document, and your Medicaid enrollment can stall for weeks. A smooth enrollment process starts with making sure every record, credential, and disclosure is consistent before the application is submitted.
Before submitting a behavioral health Medicaid enrollment application, make sure you have prepared everything.
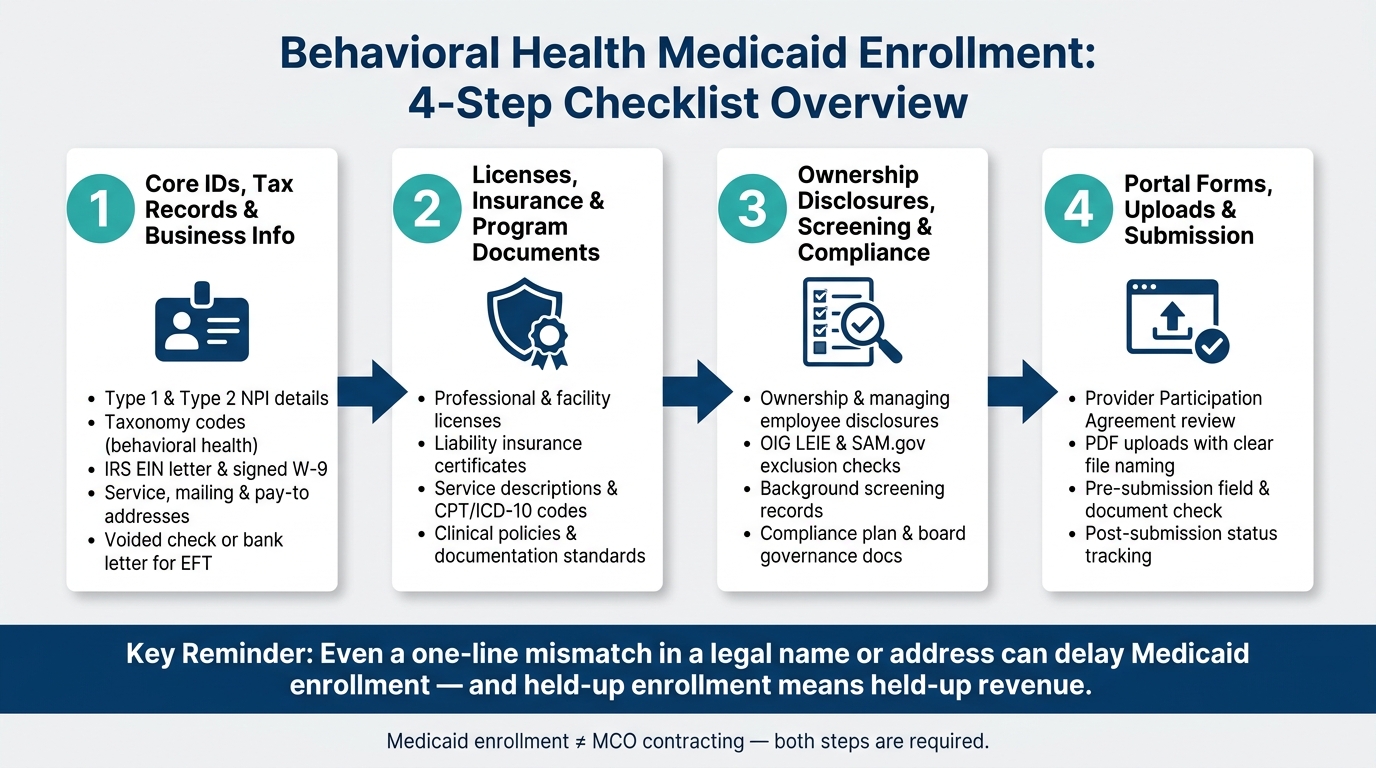
Four areas to focus on:
Core records match exactly across NPI, W-9, EIN, addresses, and bank details
Licenses and insurance are current for both the entity and each rendering provider
Ownership, screening, and compliance files are complete and ready to upload
Portal documents and PDFs are organized, clearly named, and checked before submission
A few details are especially important:
Medicaid enrollment and MCO contracting are separate processes
Small data mismatches can delay approval and payment
Many states require the same core documentation, even when their enrollment portals differ
EFT information, exclusion checks, and disclosure records should be ready before starting the application
After submission, enrollment status still needs to be monitored, along with revalidation requirements and changes to ownership or addresses
The goal is to have IDs, licenses, disclosures, banking information, and supporting documents aligned so the state can review the application without stopping to request missing or corrected information.
Even a one-line mismatch in a legal name or address can hold up enrollment—and delayed enrollment can mean delayed Medicaid revenue.
The rest of this article covers these records in the order they should be gathered and reviewed.
Behavioral Health Medicaid Enrollment: 4-Step Checklist Overview
Checklist 1: Core IDs, Tax Records, and Business Information
These records appear in almost every Medicaid enrollment application and should match exactly across all documentation.
Medicaid enrollment requires separate records for individual clinicians and billing entities 2. Check the NPI details for both and make sure the legal business name is consistent across the NPI, EIN letter, and W-9.
Taxonomy codes should also align with the behavioral health services being provided. For psychiatry or mental health services, the taxonomy code should accurately reflect the provider’s specialty. Incorrect or inconsistent taxonomy information can lead to enrollment issues, claim denials, and payment delays.
EIN, W-9, and Business Entity Documents
Keep your EIN confirmation and a signed IRS Form W-9 ready. The legal business name on the W-9 should match your IRS records exactly. It also helps to have your business formation documents close by, since many applications ask for them along the way.
Service Addresses, Contact Details, and EFT Setup
List every enrolled service location, mailing address, and pay-to address. Then check them again. Each address should match across the portal, W-9, and EFT records.
For EFT setup, have a voided check or bank letter ready to confirm the routing and account numbers tied to the billing NPI [5]. Submit EFT enrollment with the application so payment can start after approval [5]. Also confirm the remittance contact and ERA details so payments post the right way [3].
Once your IDs, tax records, addresses, and banking details line up, you can move on to licenses, insurance, and program documents.
Checklist 2: Licenses, Credentials, Insurance, and Program Documents
Next, check the licenses, insurance, and service documents that back up enrollment. These records show that you’re allowed to provide the services you plan to bill.
Professional and Facility Licenses
Upload current, active licenses for every rendering provider. The application should match the state license record exactly. Even small mismatches can slow things down.
At the facility level, pull together your agency or program license, any site-specific business permits, and, when needed, program approvals for PHP, IOP, residential treatment, or detox services. State Medicaid programs can add their own document rules, so check the portal checklist before you submit [1].
Liability Insurance and Accreditation Records
Gather your professional liability and general liability certificates, and confirm that each one shows the correct insured entity name.
If your organization has current accreditation, keep those records ready for portal review. Some states may look at accreditation during credentialing or program approval review. So even if it’s not listed as a main requirement, it’s smart to have it on hand.
Behavioral Health Service Descriptions and Clinical Policies
Keep a written service description for every billable service. It should line up with your taxonomy codes and the CPT, ICD-10, and HCPCS codes you plan to use [3].
You’ll also want your documentation standards ready, along with any policies tied to eligibility checks, prior authorization, documentation, and supervision [1][3]. These written policies help show how your organization handles care delivery and recordkeeping once enrollment is approved.
Next, gather ownership disclosures, screening records, and compliance files.
Checklist 3: Ownership Disclosures, Screening, and Compliance Files
After licenses and service policies, pull together the ownership and screening records Medicaid uses for program integrity review.
Ownership and Managing Employee Disclosures
Gather the ownership and control disclosures your state requires. That includes legal names and any SSN or EIN details the application asks for.
Your managing employee list is separate. Add each person your state treats as a managing employee, along with the information needed for the application. Putting this list together early can help keep the enrollment packet from getting stuck.
Exclusion Checks, Background Screening, and Site Visit Documents
Run OIG LEIE and SAM.gov checks for every individual your state requires. Then keep the results in your compliance file so you can show the checks were completed.
For site visits, keep audit-ready proof of your service location and standards compliance on hand in case the state asks for it [6].
Then group those records with your disclosure and governance files.
Compliance Plan, Governance Records, and a Disclosure Tracking Table
Use this tracking table to keep disclosures complete and easy to review:
Document Type
Who It Covers
Status
Ownership disclosure form
Reportable owners
Complete / Pending
Managing employee list
Managing employees
Complete / Pending
OIG/SAM exclusion check
State-required individuals
Complete / Pending
Background check / fingerprinting
State-required individuals
Complete / Pending
Compliance plan
Organization
Complete / Pending
Civil rights attestation
Organization
Complete / Pending
Board resolution / bylaws
Incorporated entities
Complete / Pending
Store disclosure files in a secure folder with access controls and audit trails, so you can pull them fast during review.
Checklist 4: Portal Forms, Upload Readiness, and Submission Tracking
With your compliance and disclosure files in order, the last step is making sure everything is ready for the portal before you start the application.
Enrollment Agreements, Attestations, and Portal Data Fields
Before you enter the state portal, review the Provider Participation Agreement and any required certification statements. Then compare the portal’s provider type and specialty fields with your confirmed taxonomy record.
If you’re enrolling as a group practice, keep group-practice linkage forms on hand so you can connect individual practitioners to the organization’s NPI and Tax ID. If you provide home- and community-based services, check whether your state asks for an Electronic Visit Verification (EVV) attestation [7][4]. And when you get to payment fields, use the bank routing and account details you already gathered.
PDF Uploads, File Naming, and Document Folder Setup
After you map the portal fields, get the supporting files ready for upload. Scan each required document as a PDF, then check that it’s easy to read, dated correctly, and within the file-size limits.
A simple naming format helps a lot. Something like ProviderName_License_2026.pdf keeps files easy to spot and sort. Store everything in a shared, access-controlled folder so both the enrollment and billing teams can pull documents fast for revalidation or follow-up requests.
Final Pre-Submission Review and Ongoing Enrollment Maintenance
Once the files are set, do one last portal review before you submit. Check that every required field, upload, disclosure, and license matches the source records. Ownership and compliance files should also be uploaded and lined up with those same records.
After submission, keep tracking the portal status. Update records for revalidation, ownership changes, and address changes so you don’t run into payment suspensions.
FAQs
What delays Medicaid enrollment the most?
The biggest delays usually come from missing or incomplete documentation, sloppy applications, and weak follow-up.
Admin problems can slow things down too. A common one is failing to check portal alerts for required revalidation notices. And because each Medicaid provider number has to be tracked on its own, uneven follow-up can push back onboarding and delay billable time.
Do I need both enrollment and MCO contracting?
Yes, in most cases, you need both to bill successfully.
Medicaid enrollment gives you approval to bill the state Medicaid program. MCO contracting is separate. That step gets you into each Managed Care Organization’s network.
If you skip the MCO contract, you may be out-of-network. And that can affect whether you get paid, how much you get paid, or whether the service is reimbursed at all.
How often should I update enrollment records?
Check your enrollment records and notifications on a regular basis. Policy shifts, billing guidance changes, and system updates can happen as often as weekly, and you may not be able to take action until an official notice goes out.
BHRev can ease the admin load by keeping enrollment data and compliance requirements current and accurate.