
Home / Ultimate Guide to Patient Intake for Behavioral Health

Behavioral health intake can make or break both access to care and payment.
Front-end errors drive about 24% of healthcare claim denials, and some behavioral health groups report up to 85% of denials tied to eligibility mistakes.
Why It Matters:
Behavioral health intake is not the same as basic medical registration.
It goes deeper into trauma, substance use, suicide risk, social history, and program fit. It also has more payer issues, like Detox, Residential, PHP, and IOP coverage rules, telehealth consent, and 42 CFR Part 2 for SUD programs.
The Most Essential Tasks:
First contact: gather basics, screen for risk, and book or escalate
Before the visit: send short digital forms, get insurance details, and run VOB
At check-in: confirm identity, updates, balances, and signed forms
For billing: document clean payer data, benefit details, and auth status
For compliance: keep HIPAA, telehealth, and SUD consent rules in order
Good intake cuts delays, rework, denials, and drop-off. In this article, we’ll explain how to set that up in a way your team can follow every time.
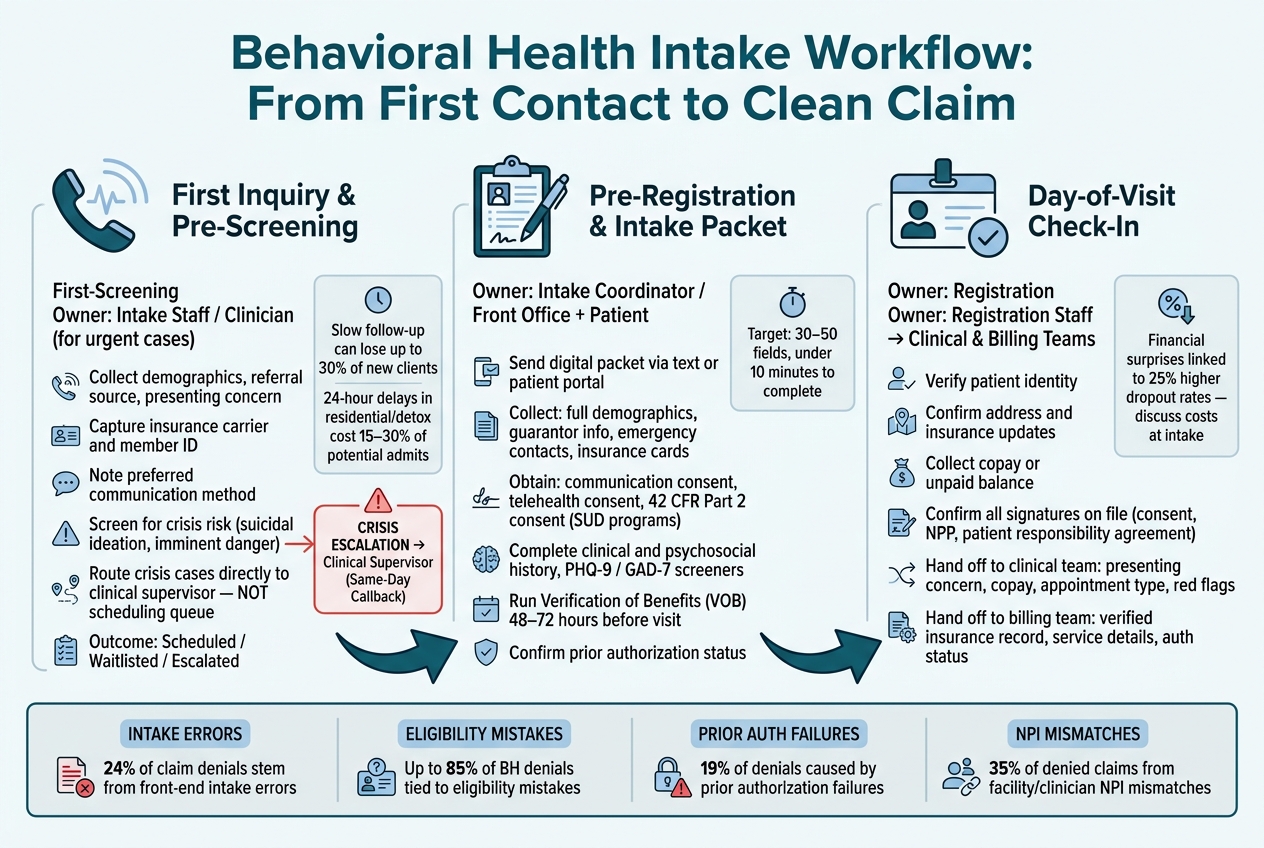
A solid intake process moves a patient through three clear stages: first inquiry and pre-screening, pre-registration, and day-of-visit check-in. If intake is where access meets revenue cycle control, this is the workflow that keeps both on track. For that to happen, each stage needs a clear owner and a clean handoff.
At first contact, speed matters. Slow follow-up and messy paperwork can sink a visit before it ever gets on the calendar. Private practices may lose up to 30% of potential new clients during the inquiry-to-appointment gap [8]. In higher-acuity settings like residential or detox, every 24-hour delay can cost 15% to 30% of potential admits [9].
An intake coordinator or admissions staff member should collect the basics right away: demographics, referral source, presenting concern, insurance carrier and ID, and the patient’s preferred way to communicate. This is also where crisis escalation logic needs to kick in. If a caller screens positive for suicidal ideation, imminent risk, or another urgent safety issue, the workflow should send them straight to a clinical supervisor, not a standard scheduling queue. The outcome should be recorded in one system: scheduled, waitlisted, or escalated.
Pre-screening also shifts based on program type. For IOP or PHP, staff need to check whether the patient can handle the time commitment, usually 9 or more hours per week. For residential or detox, withdrawal risk and overdose history are key screening items. For telehealth, staff must confirm the patient’s physical location during the session for licensing and privacy compliance [7].
Once the appointment is booked, the next move is immediate: packet completion and insurance capture.
After scheduling, gather all required details before the visit. Send the intake packet digitally by text or through the patient portal. These forms let patients complete demographics, guarantor details, emergency contacts, insurance cards, communication consent, and clinical history on their own time.
For SUD programs, the packet must include a 42 CFR Part 2-compliant consent form, which is stricter than standard HIPAA authorization [2] [7]. For telehealth patients, a separate telehealth-informed consent is also required, along with confirmation of the patient’s physical location during sessions [7].
Keep the forms short. A good target is 30 to 50 fields and under 10 minutes to complete, which helps cut down on patient drop-off [2]. Conditional logic helps here. If a patient has no substance use history, for example, SUD-specific questions can stay hidden. That makes the form feel more relevant and less like a slog. Insurance coverage should also be checked before the visit so any issues show up before check-in.
By the time the patient arrives, registration should be about verification, not scrambling for missing details.
Check-in should confirm information, not build the chart from scratch. If pre-registration was handled well, most of the heavy lifting is already done. Staff should verify the patient’s identity, ask whether the address or insurance coverage has changed since the intake packet was submitted, collect the copay or any unpaid balance, and make sure all needed signatures are on file, including consent forms and privacy notices.
The last handoff gives clinical and billing teams the details they need to do their jobs well. Clinical staff need a summary with the primary concern, confirmed copay, appointment type, and any clinical red flags. Billing staff need the right service details and a verified insurance record so the claim can be processed correctly.
The table below shows each stage, who owns it, and what must be captured.
Stage | Owner | Required Data |
|---|---|---|
First inquiry / pre-screening | Intake staff; clinician for urgent-fit decisions | Referral source, presenting concern, urgency/crisis risk, basic demographics, insurance carrier/ID, preferred communication method, scheduling or waitlist status |
Pre-registration / intake packet | Intake coordinator or front office; patient completes forms | Full demographics, guarantor details, emergency contacts, insurance cards, communication consent, telehealth consent, clinical and psychosocial history, screening tools |
Day-of-visit check-in | Registration staff; then clinical and billing teams | Identity verification, coverage or address updates, copay collection, signature confirmation, appointment and service confirmation |
A complete intake packet helps you deliver safe care and submit clean claims. The best time to collect it is before check-in. That way, the front desk can verify details instead of typing everything from scratch.
A simple way to organize the packet is into three parts:
Administrative data
Clinical history
Consent forms
The administrative section sets up both registration and billing. It should capture the patient’s legal name, date of birth, and address, plus member ID, group number, policyholder name and relationship to the insured, and coordination of benefits when the patient has more than one plan.
You also need the exact payer, plan administrator, and benefit order. If the claim goes to the wrong payer, you can end up with a hard denial or a payment delay.
Photos of the front and back of the insurance card can cut down on transcription mistakes. Exact matching matters here. Even small errors in the legal name or date of birth can lead to front-end claim rejections and payer mismatches.
This is where behavioral health intake starts to look different from standard medical registration. The form should document the presenting concern, prior psychiatric diagnoses, past hospitalizations, current medications, and medical history that may affect care, such as head injuries or chronic pain.
For SUD programs, the intake needs more detail. Record what substances the patient uses, how often, the route of use, the date of last use, and any withdrawal history, including shakes or seizures. That information supports level-of-care decisions and medical necessity.
Suicide risk and self-harm should be screened with plain, direct language. Research supports asking directly instead of using vague wording because direct questioning improves detection without increasing risk. Given that firearms are involved in over 50% of suicide deaths in the U.S. [11], intake should also screen for access to firearms and medications every time.
The clinical section should also include social determinants of health, or SDoH, such as housing stability, food access, transportation barriers, and legal involvement. These issues can shape whether a patient starts treatment at all and whether they stick with it.
Validated screeners like the PHQ-9 and GAD-7 help set a baseline for medical necessity and outcome tracking. Structured intake assessments that use tools like these have been shown to improve diagnostic concordance by 30% compared with unstructured interviews [11].
These fields guide treatment choices. They also set up the record so it can support billing.
Every intake packet needs a core set of legal and consent documents completed before services start. That set includes Informed Consent for Treatment, HIPAA Notice of Privacy Practices (NPP), Patient Responsibility Agreement, and Telehealth Consent for virtual visits.
Keep the NPP separate from treatment consent. It makes the legal acknowledgment clear and leaves less room for confusion later.
For SUD programs, add a 42 CFR Part 2-compliant authorization for disclosure.
The table below links the key intake fields to both their clinical use and their billing effect.
Intake Field | Type | Behavioral Health Rationale | RCM Impact |
|---|---|---|---|
Member ID & Group # | Administrative | Supports exact data matching with payer records. | Reduces front-end claim edits and payer mismatches. |
Coordination of Benefits | Insurance | Determines primary vs. secondary payer order for patients with multiple plans. | Prevents automatic denials for incorrect payer order. |
PHQ-9 / GAD-7 Scores | Clinical | Establishes baseline for measurement-based care. | Supports medical necessity documentation for billing. |
Risk Screening (lethal means) | Risk | Screens for suicidal ideation and access to firearms or medications. | Justifies higher reimbursement for intensive or crisis-level care. |
42 CFR Part 2 Consent | Compliance | Required for SUD programs to restrict disclosure of treatment records. | Ensures legal compliance for billing and care coordination. |
Patient Responsibility Agreement | Administrative | Clearly defines copays, deductibles, and no-show fees. | Reduces bad debt and improves front-end collections. |
Social Determinants (SDoH) | Social History | Identifies housing, transportation, or food barriers to treatment. | Improves attendance and reduces no-show revenue loss. |
Once intake forms are done, run payer clearance before the first visit. This is the point where the intake packet stops being just paperwork and becomes a financial clearance step.
Eligibility verification protects revenue. Complete a Verification of Benefits (VOB) 48 to 72 hours before the first appointment [4][12].
Check active coverage, level of care, in-network status for both the facility and clinician, deductible, copay, coinsurance, out-of-pocket max, coordination of benefits, and any behavioral health carve-out. Verify in-network status for the facility address and the rendering clinician’s NPI separately. That detail matters because facility and clinician mismatches account for 35% of denied claims [12].
Also confirm whether behavioral health benefits are carved out to a third-party administrator such as Optum, Magellan, or Carelon. If a carve-out exists and the claim is billed to the primary medical payer instead, you can end up with hard denials that often can’t be fixed or resubmitted [4][13].
For every verification, log:
Date
Representative name and ID
Reference number
That reference number is your proof if the payer pushes back on the claim [4][14].
Re-verify at the start of each calendar year, monthly for active patients, and anytime a patient moves up or down in level of care [12][1].
Use this same window to explain patient financial responsibility. Financial surprises are linked to 25% higher dropout rates in addiction recovery programs [12]. So if a patient has a large deductible before coverage starts paying, they need to hear that during intake, not after services begin [4].
Once benefits are confirmed, the next step is to find out whether the requested level of care needs prior authorization.
Start prior authorization during intake. Authorization failures account for 19% of all claim denials [13], and the paperwork takes time. That usually includes a completed screening, diagnosis, and proof of medical need using criteria like ASAM for substance use or InterQual for mental health [14].
Make sure the request goes to the right place. Behavioral health utilization management may sit with the primary payer or with a carve-out administrator. If the request goes to the wrong entity, you lose time fast.
Authorization windows can be short, sometimes only two weeks. Build reauthorization alerts into the workflow at least 48 hours before expiration so you don’t run into Gap Days, when care is delivered without active coverage [4][5].
Avoid admitting patients to IOP, PHP, and residential care without a same-day VOB note on file, unless there is a clearly defined clinical emergency [12].
Manual checks slow everything down and add rework. That’s where automation helps.
BHRev automates eligibility verification, claim scrubbing, denial tracking, and financial estimates for behavioral health providers. It also supports denial tracking and predictive analytics.
Workflow Step | Manual Process | Tech-Enabled Process | Impact |
|---|---|---|---|
Eligibility Check | Staff calls payer or logs into multiple portals; manual data entry. | Real-time API (270/271) validates coverage in under 60 seconds [9]. | Cuts eligibility-related denials (up to 24% of all denials) [5]. |
Benefit Detail Capture | Manual transcription of carve-outs and session limits. | AI flags carve-outs and level-of-care rules automatically [9]. | Saves 20–40 minutes per call [12]. |
Prior Authorization | Hand-assembled clinical packets submitted by fax or portal. | Automated assembly of clinical data into payer-specific templates [9]. | Prevents Gap Days and unauthorized service denials [5]. |
Financial Estimates | Manual calculation based on VOB notes. | Instant patient responsibility estimates generated during intake [5]. | Reduces bad debt and lowers dropout rates [12]. |
This only works if the process is standardized across programs and staff.
Automation and verification tools help, but they don’t fix a messy process. They work best when the workflow is set the same way every time, with written SOPs, clear ownership, and program-specific checklists [10][1]. Once eligibility and authorization are handled, the main threat is workflow drift.
Start with one master intake policy. Then build role-based SOPs for the front desk, intake, clinical, authorization, billing, and site leadership [10][1]. After that, create checklists for each program.
That part matters more than it may seem. Outpatient therapy doesn’t have the same intake needs as IOP/PHP, residential, or telehealth. If a team handles them all the same way, gaps show up later, and those gaps often hit the revenue cycle [3][1].
Program | Checklist Focus | Primary Owner |
|---|---|---|
Outpatient | Eligibility, demographics, consent, copay, referral/source | Intake coordinator / front desk |
IOP/PHP | Level-of-care coverage, prior auth, session/day limits, reauthorization timing | Intake + authorization staff |
Residential | Pre-admission screening, verification before travel/admission, clinical necessity, authorization before arrival | Admissions / clinical intake |
Telehealth | Patient physical location, privacy confirmation, telehealth consent, emergency contact, technology readiness | Intake coordinator / clinician |
Multi-site | Correct location selection, location-specific payer rules, standardized documentation fields | Site manager + central RCM |
For multi-site groups, the core workflow should stay the same across locations. At the same time, each site still needs its own payer-rule checks. Facility address, service codes, and other site-level details have to match the correct location, or the team risks denials that could have been avoided [1].
Once the workflow is set, staff need a script that protects trust while still gathering payer-ready facts. A good approach is to begin with the presenting concern, move into factual history, and save more sensitive topics – substance use, trauma, and risk – until some trust has been built [7].
Intake is about gathering facts, not pushing people to disclose everything at once. Staff should let patients know that more detail can come later [7]. That small shift can make the conversation feel less clinical and more human.
On the payer side, wording matters. Staff should document in insurance language. For example, phrases like “prior unsuccessful outpatient treatment” can support the need for a higher level of care [5]. Intake questions also need to be precise. If the question is vague, the answer usually is too, and that leads to weak support for the claim.
There’s also no room for delay when risk is involved. If a patient screens positive for suicidal ideation, the process should skip routine check-in and go straight to a clinical supervisor for a same-day callback [6].
A strong intake process helps patients get care sooner and helps the organization protect cash flow. When every step has a clear owner, is documented, and is carried out the same way across programs and locations, teams see fewer denials, less rework, and a smoother path into care. Intake is the point where access and reimbursement either stay in sync or start to break down.
Before the first visit, collect a few basics so intake doesn’t turn into a scramble later.
Demographic and insurance details: full legal name, date of birth, contact information, member ID, group number, and the insurance card
Clinical information: medical and psychosocial history, presenting concerns, treatment goals, and current symptoms
Required forms: informed consent, credit card authorization, and the HIPAA privacy notice
You’ll also want to verify benefits before the appointment. That means checking active coverage, in-network status, copay, deductible, and any prior authorization rules.
Verify benefits and prior authorization 48 to 72 hours before the scheduled appointment. That window gives your team enough time to fix mismatches, begin any needed authorizations, and share cost estimates before the patient shows up.
For high-cost admissions or residential placements, verify even earlier. It also makes sense to re-check at the start of each calendar year, after any insurance change, or when a patient moves to a higher level of care. Don’t wait until the day of service.
Intake staff should focus first on risk factors and safety concerns during the initial encounter. The goal is to spot urgent issues right away, such as suicidality, severe withdrawal, or acute psychiatric instability.
Using structured intake forms or pre-admission screening, they can figure out whether the person needs immediate intervention or a different treatment setting. BHRev can support these workflows with efficient data routing and compliance.
If you’re running under 3 FTEs of billing, denials is the first place to outsource — the unit economics on hiring don’t work below that scale.
We staff full denials teams for behavioral-health practices and recover an average of 32% of aged A/R prior agencies wrote off. 30-minute consultation, no pitch.
The denials team’s job isn’t only to recover today’s denials — it’s to close the loop with intake so the same denial doesn’t show up next week. Three reports we run weekly:
| Report | What it shows | Owner |
|---|---|---|
| Denial reason by payer | Patterns by payer, not just by code | A/R lead |
| First-pass vs. final-pass | Whether scrubbing rules are catching the right errors | Billing lead |
| Time-to-work histogram | How long denials sit before being worked | Operations |
A denials operation isn’t a queue to clear — it’s a feedback loop. Done well, it pays back its own cost in the first quarter and improves clean-claim rate quarter over quarter. Done poorly, it becomes a write-off factory.
If you’re not sure where yours sits, the 30-minute consultation linked above is the easiest way to find out.
One email a month, no fluff. Unsubscribe anytime.